Power cleans and other Olympic-style lifts can offer some athletes performance advantages over more common forms of weight lifting…
While Olympic-style lifts have long been employed by traditional power athletes such as football players, sprinters and wrestlers, Strength and Conditioning Specialists are incorporating theses exercises into more and more sport-specific routines.
Lifts such as power cleans involve very high power outputs and high rates of force production, both of which can transfer to increased speed and explosiveness on the field or court. As Olympic-style lifts tend to be total body exercises, they increase neuromuscular co-ordination and that buzzword… core stability. However, there is a caveat…
The most important goal of any strength training program, and indeed the exercises that form it, is specificity. More recently, power cleans seem to be first on the list when it comes to exercise selection by strength coaches. Remember, that the first step in designing a successful strength program for sport, is a needs and movement analysis…
Power cleans involve mainly the extensor muscles of the hips, abdominals and trunk. Yet many sports for which they are recommended work predominantly the opposite – the hip flexor muscles. Other exercise choices, combined with the correct loading patterns for power development may be more suitable.
Even where exercises such as power cleans are relevant, they must be carefully planned into the overall program. Completing Olympic-style lifts all year round is not necessary for most athletes and they should always follow a phase of functional strength training – particularly in less experienced athletes. Even a short 6-8 week phase (most likely in the off/early pre-season) that incorporates power cleans and similar exercises can translate into significant improvements in competition for relevant sports.
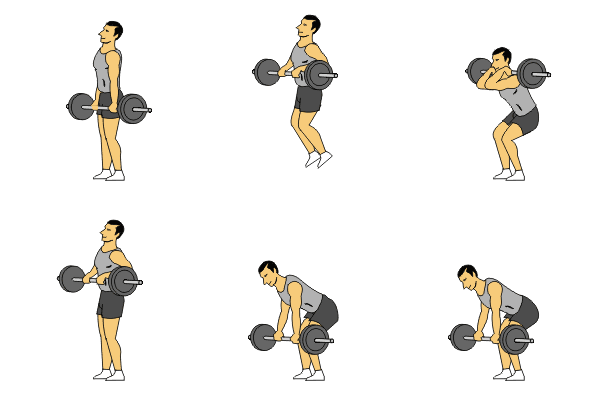
Power Cleans

Starting Position:
- Stand with feet slightly wider than hip width apart and toes pointing out slightly.
- Squat down and grasp bar with a closed, pronated grip. Hands should be slightly wider than shoulder width apart outside knees with elbows fully extended.
- Place bar about 1 inch (3cm) in front of shins and over balls of the feet.
- Back should be flat or slightly arched.
- Chest should be held up and out.
- Scapulae (shoulder blades) should be retracted.
- Head should be in a neutral position (in line with vertebral column and not tilted or rotated).
- Eyes should be focused straight ahead.
First Pull Phase:
- Lift bar from floor by forcefully extending hips and knees.
- Upper torso should maintain same angle (i.e. do not bend at the waist yet).
- Do not let hips rise before shoulders (this would have the effect of pushing the glutes in the air and stretching the hamstrings)
- Keep elbows fully extended (straight), head in a neutral position and shoulders over the bar.
- As bar raises keep it as close to shins as possible.
Transition (Scoop) Phase:
- As bar passes knees, thrust hips forward and slightly re-flex knees to avoid locking them. Thighs should be against bar.
- Keep back flat or slightly arched, elbows fully extended and head neutral.
Second Pull Phase:
- Forcefully and quickly extend hips and knees and plantar-flex ankles (stand on toes).
- Keep bar as close to body as possible.
- Back should be flat, elbows pointing out to sides and head neutral.
- Keep shoulders over bar and elbows extended (arms straight) as long as possible.
- When lower body joints reach full extension rapidly shrug the shoulders upward, but do not let elbows flex yet.
- As shoulders reach their highest elevation flex elbows to begin pulling body under bar.
- Continue to pull arms as high and as long as possible.
- Due to explosive nature of this phase torso is erect or slightly hyper-extended (arched back), head is tilted back slightly and feet may lose contact with floor.
Catch Phase:
- After lower body has fully extended and bar reaches near maximal height, pull body under bar and rotate arms around and under bar.
- Simultaneously, hips and knees flex into a quarter squat position.
- Once arms are under bar, lift elbows to position the upper arms parallel to floor. Rack the bar across front of clavicles (collar bones) and anterior deltoids (front shoulder muscles).
- Catch bar with an erect, tight torso, neutral head position, flat feet.
- Stand up by extending hips and knees to a fully erect position.
Downward Movement Phase:
- Lower bar by gradually reducing muscular tension of arms to allow a controlled descent of the bar to the thighs.
- Simultaneously flex the hips and knees to cushion the impact of the bar on the thighs.
- Squat down with the elbows fully extended until the bar touches the floor.
Hang Cleans

Hang cleans are a variation on power cleans and place less emphasis on the lower body. Technique is the same as a classic power clean described above except that the starting position of the bar is hanging at the mid thigh rather than on the floor.
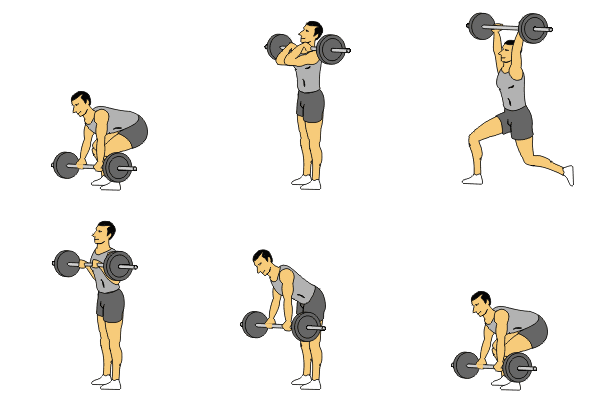
Clean & Jerk

The clean and Jerk is an Olympic lift and performed in two stages. The first stage – a power clean – is completed with the same technique as described above. The second stage is a push jerk and is described below. Due to the pull-push nature of this lift, the clean and jerk works virtually every major muscle group in the body.
Starting Position:
- Start from the end of the Catch Phase in a power clean.
Dip Phase:
- Slightly flex hips and knees keeping feet flat on the floor.
- Keep torso erect and upper arms parallel to the floor.
Drive Phase:
- Forcefully and quickly extend hips and knees and then elbows to press bar overhead.
- Simultaneously split the legs so that one foot is in front and one behind.
- Once bar is overhead, establish a position where elbows are fully extended, torso is erect and tight, head is in a neutral position.
- Bring both feet in line with the shoulders by drawing the front foot backward first and then the back foot forward.
Downward Movement Phase:
- Lower bar by gradually reducing muscular tension of arms to allow a controlled descent of the bar to the shoulders.
- Simultaneously flex the hips and knees to cushion the impact of the bar on the shoulders. Note DO NOT drop the bar or lower it without bending the knees as is seen in the animated diagram.
Sources
1) Baechle TR and Earle RW. (2000) Essentials of Strength Training and Conditioning: 2nd Edition. Champaign, IL: Human Kinetics

Jacky has a degree in Sports Science and is a Certified Sports and Conditioning Coach. He has also worked with clients around the world as a personal trainer.
He has been fortunate enough to work with a wide range of people from very different ends of the fitness spectrum. Through promoting positive health changes with diet and exercise, he has helped patients recover from aging-related and other otherwise debilitating diseases.
He spends most of his time these days writing fitness-related content of some form or another. He still likes to work with people on a one-to-one basis – he just doesn’t get up at 5am to see clients anymore.