Use these flexibility tests before you begin a stretching program and then every 6-8 weeks during your flexibility training.
Before you perform these tests make sure you warm up thoroughly with 10 minutes of light jogging or skipping.
Click here for details on how to put together a battery of physical fitness tests.
Modified Sit And Reach Test
The sit and reach test is the most common flexibility test. It measures the flexibility of the lower back and hamstrings. It requires a box about 30cm (12 inches) high and a meter rule:
- Sit on the floor with your back and head against a wall. Legs should be out straight ahead and knees flat against the floor.
- Have someone place the box flat against your feet (no shoes). Keeping your back and head against the wall stretch your arms out towards the box.
- Have someone place the ruler on the box and move the zero end towards your fingertips. When the ruler touches you fingertips you have the zero point and the test can begin.
- Lean forward slowly as far as possible keeping the fingertips level with each other and the legs flat. Your head and shoulders can come away from the wall now. Do NOT jerk or bounce to reach further.
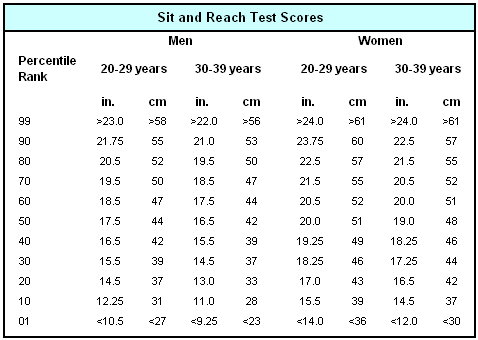
- Slowly reach along the length of the ruler 3 times. On the third attempt reach as far as possible and hold for 2 seconds. Have your training partner read the score. Repeat twice and compare your best score with the table below.
The following table is data from the American College of Sports Medicine (1995) for performance in the sit and reach test:

Alternatively you can get the sit and reach test including a protocol guide at Power-Systems.com
Trunk Rotation Test
This flexibility test measures trunk and shoulder flexibility. The only equipment required is a wall and a piece of chalk or pencil.
- Mark a vertical line on the wall. Stand with your back to the wall directly in front of the line. You should be about arms length away from the wall with your feet shoulder width apart.
- Extend your arms out directly in front of you so they are parallel to the floor. Twist your trunk to your right and the touch the wall behind you with your fingertips. Your arms should stay extended and parallel to the floor. You can turn your shoulders, hips and knees as long as your feet don’t move.
- Mark the position where your fingertips touched the wall. Measure the distance from the line. A point before the line is a negative score and a point after the line is a positive score.
- Repeat for the left side and take the average of the 2 scores and compare with the table below:
| Trunk Rotation Test | |||||
| Poor | Fair | Good | Very good | Excellent | |
| 0cm | 5cm | 10cm | 15cm | 20cm | |
Groin Flexibility Test
This flexibility test measures flexibility in the adductors. The only piece of equipment you require is a ruler or tape measure:
- Sit on the floor with your knees bent, feet flat on the floor and legs together.
- Let your knees drop sideways as far as possible keeping your feet together. The soles of your feet should be together.
- Clasp your feet with both hands and pull you ankles as close to your body as possible. Measure the distance from your heels to your groin. Compare the results with the table below…
| Groin Flexibility Test | |||||
| Poor | Fair | Good | Very good | Excellent | |
| 25cm | 20cm | 15cm | 10cm | 5cm | |
Goniometer Testing
If you are about to start a flexibility training program, a goniometer is an ideal and inexpensive piece of testing kit. It is essentially used like a large set of compasses or protactor to measure joint angles.

Jacky has a degree in Sports Science and is a Certified Sports and Conditioning Coach. He has also worked with clients around the world as a personal trainer.
He has been fortunate enough to work with a wide range of people from very different ends of the fitness spectrum. Through promoting positive health changes with diet and exercise, he has helped patients recover from aging-related and other otherwise debilitating diseases.
He spends most of his time these days writing fitness-related content of some form or another. He still likes to work with people on a one-to-one basis – he just doesn’t get up at 5am to see clients anymore.